01
Download Input
Create Actions, Multi Action or simply remap your Creator Micro 2 with Input.
*If you already have Input installed, make sure to update it to the latest version to use your Creator Micro 2. If you’re using a different cable than the one provided and it doesn’t connect, please make sure you’re using a data cable.
02
Turn your Micro on/off
Pro model: click the rear button once to turn it on, and hold it for 2 sec to turn it off.
Base model: just plug & unplug it
03
Change layers
The Micro is equipped with a touch sensor on the bottom left and three LEDs that indicate which layer you are currently on (max 6 layers). Tap the sensor to cycle through the layers:


04
How to connect using Bluetooth (PRO only)
Enter communication mode
Hold the touch button for 3 seconds.
The Micro's underglow will turn blue, indicating BLE mode.
Tap the sensor to cycle through BLE channels 1 / 2 / 3
A 4th tap will trigger WIRED mode (underglow turns white)
Pairing
A fast-flashing LED indicates pairing mode.
When the LED turns solid, pairing is complete.
To re-pair, hold the touch button for 3 seconds on your desired channel until it starts blinking again.
Exit communication mode
The Micro automatically exits communication mode after 5 seconds of inactivity.
Note
While in BLE mode, if you plug in the USB cable, it will remain in BLE mode and start charging.


05
Software-linked layers (AppSense)
Link a software to a specific layer, and your Micro will automatically switch to that layer when the app is in focus.
How to Link a software to a layer?
Click the "link" icon near the layer name.
Then click “Auto detect”.
Now open the app you want to link and keep in focus for 5 sec.
06
Battery level (PRO only)
Tap the on/off button once to show the battery level.
Full charge = 50 days (no rgb)
10%: underglow slowly pulses red (every 10 mins)
5%: underglow slowly pulses red (every 5 mins)
2%: underglow blinks red twice (every 2 mins)
07
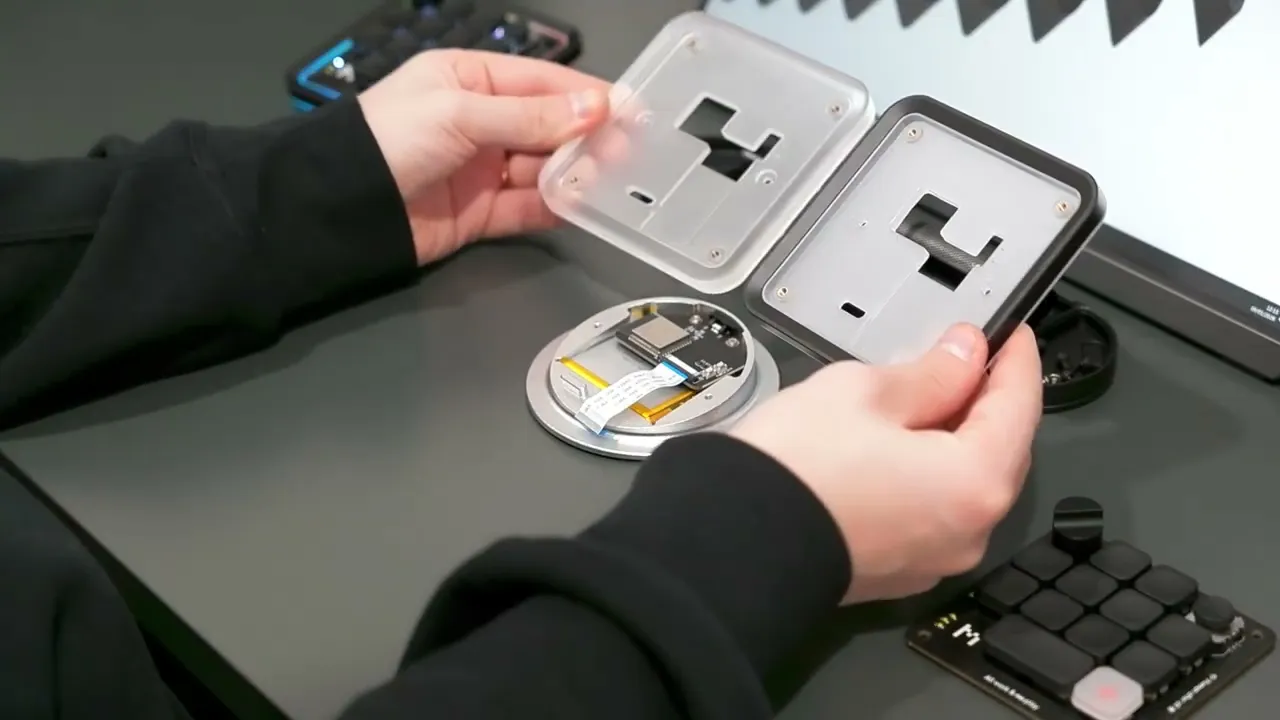
Reset your device
If you Micro freezes, or will not turn on/off, a soft reset will fix it:
Soft reset
Unscrew the four screws located at the corners of the PCB.
Gently lift the PCB — be careful, as a flat cable connects the top PCB to an internal lower PCB.
You will see two buttons marked with dots:
One dot (top): Reset
Two dots (bottom): Boot
Press the Reset button (the top one) once.
Your keyboard will reboot and become operational again.
keyboard profile & layer reset (If your layout in Input is corrupted)
With your Micro 2 connected into Input open the Setup tab
Click "Reset settings" & confirm
Now all your layers and profile and actions are deleted